- Please check out http://www.slide.com.
- First you must registered at slide.com.
- Click at Sign up (this is free).
- Insert your email address and password would you want.
- Then click Sign up button, and then automatically sign in to your account.
- Next step is making animation photo.
- Click Style for choosing your animation style.
- Click Skin for choosing your animation skin.
- Click Size for choosing your animation size.
- Click Select Image button, and then insert your photo or image file.
- Click Upload button for uploading your photos or images.
- If uploading is done, click Save button.
- Copy the HTML Code that given, and then paste at notepad or another text editor.
- Click Log Out to exit from slide.com. Close your browser page if you want.
- Done. Next step is inserting your animation photo to your blog.
Now you can add your animation photo code to your blog, please following the steps :
- Login to blogger with your ID.
- At the dasboard page , click Layout.
- Click at Page Element tab. See the picture below :
- Click at Add a Page element.
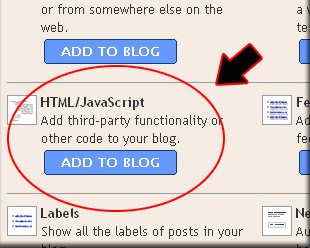
- After emerging pop up window , Klik add to blog button for the things HTML/JavaScript. See the picture following :
- Open your animation photo code, copy and then paste into available column.
- Click

- Done. Please see the result.


This is example animation photo from slide.com :
Also you can get animation photo from www.picturetrail.com :
 |  | Get Your Own! |
Or you can sign up to www.flickr.com
Happy blogging brothers. if you feel interest with this post, please digg it.
See you at my next tips.
Subcribe in reader. Please Click here !


0 comments:
Post a Comment