- Please check out http://www.slide.com.
- First you must registered at slide.com.
- Click at Sign up (this is free).
- Insert your email address and password would you want.
- Then click Sign up button, and then automatically sign in to your account.
- Next step is making animation photo.
- Click Style for choosing your animation style.
- Click Skin for choosing your animation skin.
- Click Size for choosing your animation size.
- Click Select Image button, and then insert your photo or image file.
- Click Upload button for uploading your photos or images.
- If uploading is done, click Save button.
- Copy the HTML Code that given, and then paste at notepad or another text editor.
- Click Log Out to exit from slide.com. Close your browser page if you want.
- Done. Next step is inserting your animation photo to your blog.
Now you can add your animation photo code to your blog, please following the steps :
- Login to blogger with your ID.
- At the dasboard page , click Layout.
- Click at Page Element tab. See the picture below :
- Click at Add a Page element.
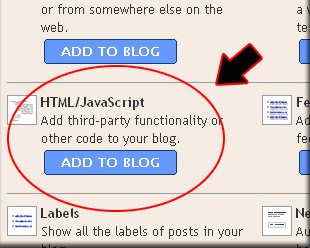
- After emerging pop up window , Klik add to blog button for the things HTML/JavaScript. See the picture following :
- Open your animation photo code, copy and then paste into available column.
- Click

- Done. Please see the result.


This is example animation photo from slide.com :
Also you can get animation photo from www.picturetrail.com :
 |  | Get Your Own! |
Or you can sign up to www.flickr.com
Happy blogging brothers. if you feel interest with this post, please digg it.
See you at my next tips.


0 comments:
Post a Comment